Managing access to Business Intelligence (BI) tools is critical for protecting sensitive data, ensuring compliance, and maintaining operational efficiency. Without proper controls, BI platforms can expose organizations to security risks, data breaches, and regulatory fines. Here's a quick rundown of the most effective practices:
- Authentication: Use Multi-Factor Authentication (MFA) and Single Sign-On (SSO) to secure user identities and simplify logins.
- Authorization: Implement Role-Based Access Control (RBAC) and Row-Level Security (RLS) to limit data access based on roles and job functions.
- Auditing: Regularly review permissions, monitor user activity, and identify inactive accounts to prevent security gaps.
- Least Privilege Principle: Ensure users only have the minimum access needed for their role. This reduces risks like "permission creep."
- Automation: Use Identity Governance tools and automated workflows to manage permissions, revoke access for former employees, and secure new data assets.
- Compliance: Conduct quarterly access reviews, track high-risk activities, and use sensitivity labels to safeguard critical data.
These practices help organizations secure their BI environments, reduce risks, and stay compliant with regulations like GDPR and HIPAA. Start by auditing your current access controls and aligning them with these strategies to protect your BI tools effectively.
Mastering Roles & Permissions in Power BI & Fabric
sbb-itb-3a330bb
Setting Up Role-Based Access Control (RBAC)
Power BI Workspace Roles and Permissions Comparison Chart
Role-Based Access Control (RBAC) is a security framework that organizes users into roles - like Admin, Member, Contributor, and Viewer - and assigns permissions based on those roles. This system helps enforce the Principle of Least Privilege, ensuring users only have the access they need. It’s also a scalable way to handle permissions as organizations grow and change. By implementing RBAC correctly, you can avoid issues like "permission creep", where users accumulate unnecessary access over time. As The Grow Team puts it:
RBAC provides a scalable solution that can adapt to changing organizational structures and roles. Whether a company is expanding its workforce, adding new departments, or integrating new low code and no code platforms, RBAC can easily accommodate these changes without compromising security or efficiency.
Using directory-based role assignments has been shown to reduce incidents of permission drift by 36% and cut untracked sharing problems by 27%. Next, let’s look at how to set up RBAC in a way that aligns with your organization’s structure.
How to Configure RBAC
Start by mapping roles to your organization's hierarchy. Design these roles to reflect reporting structures and job responsibilities, so access naturally aligns with how your business operates. Instead of assigning permissions to individual accounts, use security groups (such as Azure AD/Entra ID groups). This makes audits easier and ensures permissions stay consistent even when employees change roles or leave.
For Power BI, it’s important to separate the Contributor role (for developers creating content) from the Member role (for those managing app deployments). Reza Rad, a Microsoft Regional Director and MVP, highlights the importance of this separation:
The separation of Member Role and Contributor Role is one of the best advantages of the new version of workspace... The last thing you want is for a developer from the DEV team mistakenly push the button and publish content that is not yet user-ready to the end users.
To avoid confusion, don’t assign the "Viewer" role directly to end-users in a workspace. Instead, grant them access through Power BI Apps. This creates a clear distinction between your development environment and the content users interact with. For better scalability, integrate your BI platform with HR systems so that changes in roles or employee departures automatically update permissions.
Common BI Roles and Permissions
Once RBAC is set up, defining roles clearly is essential for maintaining effective access control. Most BI tools use four primary roles, each with specific permissions.
- Admins: They have full control, including adding or removing users, changing workspace settings, and deleting workspaces. To minimize risk, limit this role to two individuals per workspace, plus a "break-glass" service account for emergencies.
- Members: These are deployment managers who can add users with lower permissions and handle app publishing or updates. However, they can’t delete workspaces or manage Admins.
- Contributors: Typically, these are your developers. They can create, edit, and delete reports and datasets but can’t manage workspace access or publish Apps.
- Viewers: This group has read-only access. They can interact with reports and dashboards but can’t modify content or view underlying datasets.
Here’s a quick overview of these roles:
| Power BI Role | Key Permissions | Best For |
|---|---|---|
| Admin | Full control; can add/remove admins and delete workspaces | IT Admins / BI Managers |
| Member | Can add users, publish/update Apps, and edit content | Deployment Managers |
| Contributor | Can create, edit, and delete reports/datasets; cannot share | BI Developers |
| Viewer | Read-only access to reports and dashboards | Test Users (Apps preferred for End-Users) |
Investing in administrator training is also worthwhile. It can reduce misconfiguration errors by 33%, ensuring your team is equipped to manage roles effectively.
Using the Principle of Least Privilege
The Principle of Least Privilege (PoLP) is all about limiting access - every user should only have the minimum permissions required to do their job, nothing extra. This is especially important for BI platforms, which often manage huge volumes of sensitive business data. Without PoLP, a single compromised account could open the door to critical information. Consider this: on average, employees have access to 11 million files. Combine that with the fact that human error contributes to 82% of cybercrime incidents, and you’re looking at an average cost of $3.24 million per breach.
PoLP also helps tackle permission creep, a common issue where users retain access rights from past roles or projects. Over time, these outdated permissions can create hard-to-detect security gaps. That’s why regular audits are essential to clean up unnecessary access and close those gaps.
Matching Roles to Job Functions
To maintain minimal privilege, align access permissions with job responsibilities. Map BI roles to your organizational structure and workflows. This ensures access is tied to actual job functions, not outdated roles or assumptions. Permissions should always reflect current job needs.
Create a scalable system by separating access roles from functional roles. For example, access roles might define permissions like "read-only access" to a database, while functional roles refer to job titles like "Financial Analyst." By linking access roles to functional roles, you create a system that’s easier to manage as your organization grows.
Group users into three main tiers:
- Administrators: Full system access for maintenance and security.
- Specialists: Access to advanced no-code and low-code tools and broader datasets for complex tasks.
- End Users: View-only access to specific reports needed for daily work.
Most users should fall into the End User category, keeping their permissions as limited as possible.
To further refine access, use Row-Level Security (RLS) to control which data a user can see within a report. For instance, a sales rep should only view data for their own region. Similarly, Column-Level Security (CLS) can hide sensitive fields - like salaries or Social Security numbers - from users who don’t need that information.
Assign BI roles to security groups (e.g., Entra ID groups) instead of individual users. This way, when someone leaves or changes teams, their access is automatically updated. You can also configure "Future Grants" to apply predefined permissions to any new tables or views in a schema, ensuring consistent security without requiring manual updates.
Classifying Resources by Sensitivity
Not all data carries the same level of risk, so start by conducting a permissions audit. List all user accounts and resources - datasets, reports, dashboards - and identify who has access to what. This will help you spot vulnerabilities and focus on areas that need stricter controls.
Next, map out where data can leave your BI tool. Think about bulk exports, API access, scheduled reports, and shared links. Roman Mohren, CEO of FullSession, sums it up well:
Analytics permissions fail when teams treat access as one knob instead of a set of exposure paths.
Organize resources into three layers:
- Data Layer: Raw data and identifiers.
- Experience Layer: Dashboards and reports.
- Capability Layer: Functions like exporting, sharing, and admin rights.
Focus on locking down the Capability Layer first, as this is where data is most likely to leave the platform.
Define sensitivity levels based on risk. For example, financial records, personal customer data (PII), and internal-only reports should have stricter controls than general business metrics. Use managed access schemas, where only schema owners or security administrators can grant privileges. This prevents individual object owners from making independent (and potentially risky) decisions.
For platforms like Power BI, manage permissions by distributing content through "Apps" rather than sharing individual reports. Sharing items one by one can lead to errors and permission creep. Temporary access with fixed expiration dates is another effective way to avoid privilege sprawl.
Adding MFA and SSO for Better Security
Building on robust RBAC and the principle of least privilege, Multi-Factor Authentication (MFA) and Single Sign-On (SSO) add an extra layer of protection to your BI environment, helping to prevent unauthorized access.
Why Use MFA and SSO
MFA significantly reduces risks tied to password-only authentication. Since passwords are often compromised, MFA acts as a backup layer, requiring additional verification - like a code from an app or a biometric scan - before granting access. This is crucial for BI tools that store sensitive data, such as financial records, customer information, and strategic insights.
On the other hand, SSO simplifies the login process by enabling employees to access multiple BI platforms (e.g., Power BI, Snowflake, Oracle) with just one set of credentials. This not only eliminates the hassle of managing multiple passwords but also reduces IT support requests for password resets. SSO works through a central Identity Provider (IdP), which enforces strong password policies and MFA, lowering the risk of weak or reused passwords. As Enos Otieno Juma from Syncfusion puts it:
With SSO, one strong password goes through an app designed for high security, giving employees access to all their business apps, without giving those apps access to that password.
A key advantage of SSO is that it eliminates static credentials from connection strings. This is why Snowflake plans to phase out single-factor password authentication by November 2025 or April 2026.
How to Set Up MFA and SSO
To implement MFA and SSO effectively, follow these steps:
- Choose a unified Identity Provider: Opt for top low-code platforms or identity providers like Microsoft Entra ID (formerly Azure AD), Okta, or Ping Identity to manage authentication across all your BI tools. This ensures consistent security policies and simplifies administration. For cloud-based BI tools, prioritize "Active Directory Universal Authentication", which supports interactive MFA and guest users.
- Use secure MFA methods: Favor passkeys or authenticator apps (TOTP) over SMS or phone callbacks, as they offer better security and usability. To improve user experience, enable MFA token caching - for instance, Snowflake allows tokens to be cached for up to four hours - reducing the need for repeated prompts.
-
Enforce MFA for high-privilege roles: For roles like Snowflake's
ACCOUNTADMIN, make MFA mandatory to prevent account takeovers. Additionally, implement adaptive security measures using Conditional Access to trigger MFA only when risk factors, such as location or device compliance, indicate a potential threat. -
Fine-tune SSO settings: Use parameters like
EXTERNAL_OAUTH_ALLOWED_ROLES_LISTto control which high-privilege roles can be assumed via SSO tokens. Ensure the unique identifier in your IdP (e.g., UPN or Email) matches the login attribute in your BI tool to avoid "User not found" errors during authentication. - Prepare for emergencies: Establish "break glass" access by creating emergency accounts with one-time passcodes (OTPs) stored securely in a vault. This ensures you can maintain access if your primary IdP experiences downtime.
- Automate IP whitelisting: Cloud provider IP ranges often change weekly, so set up automated jobs to fetch JSON service tags and update your BI tool's network policies. Tools like Snowflake's Strong Authentication Hub can help identify users still relying on single-factor passwords, guiding them through the migration process.
Running Regular Access Reviews and Audits
Even with strict controls in place, permissions can drift over time. Employees switch roles, contractors complete their projects, and some staff leave the company altogether - but their access to business intelligence (BI) systems often remains unchanged. A 2022 survey revealed that 83% of employees retained some access to digital assets from a previous employer. This "privilege creep" can lead to major security risks, especially when 62% of organizations have experienced data breaches tied to the misuse of employee access rights.
Regular access reviews are essential to catching outdated permissions before they become security holes. These audits help ensure that access to BI tools and sensitive data is limited to the right individuals, while also keeping organizations compliant with frameworks like SOC 2, HIPAA, and PCI DSS. Here’s how to approach these reviews effectively.
How to Conduct Access Audits
Start by defining the scope and goals of your review. Identify all BI systems - whether they’re cloud-based or on-premises - and focus on high-risk areas like financial dashboards, HR analytics, or customer data repositories. For example, you might audit Power BI workspaces with revenue forecasts quarterly, while lower-risk tools could be reviewed annually.
Next, gather and centralize access data from your identity providers (e.g., Okta or Microsoft Entra ID) or directly from your BI platforms. Collect user lists, assigned roles, permissions, and key timestamps like "last login" dates. Tools for Identity Governance and Administration (IGA), similar to the enterprise solutions found in low code platform Forrester Wave insights, can simplify this process by syncing data and offering a unified dashboard.
Assign audit responsibilities to stakeholders who understand their teams’ access needs. IT teams alone can’t decide if a marketing analyst still requires access to production-level data - that’s a call for the marketing director.
During the review, confirm that permissions align with current job roles by applying Role-Based Access Control (RBAC) and the Principle of Least Privilege (PoLP). Look for users who have accumulated permissions from previous roles that were never revoked. Pay special attention to Segregation of Duties (SoD) violations, where one person has conflicting permissions that could allow them to commit and hide fraudulent activity.
For users whose roles have changed, immediately revoke or downgrade access. Set clear Service Level Agreements (SLAs) to ensure timely action: for example, 24 hours for critical accounts and five days for medium-risk changes. Always verify that access removals worked - whether by testing revoked credentials or checking downstream systems.
Finally, keep tamper-evident logs for compliance purposes. Document who reviewed what, the decisions made (approved, modified, or revoked), and the rationale for any unusual access.
| Review Type | Focus Area | Recommended Frequency |
|---|---|---|
| Privileged Access | Admin accounts, critical infrastructure | Quarterly |
| Event-Based | Role changes, terminations, transfers | Immediate/Ad-hoc |
| Standard User | General SaaS tools, low-risk apps | Bi-annually or Annually |
| Unused Access | Accounts inactive for 30+ days | Monthly |
Finding Inactive Accounts and Errors
After reviewing access permissions, shift your attention to inactive accounts and permission errors. Inactive accounts are easy targets for attackers. Cross-check your BI system access lists with HR records to locate "orphaned accounts" belonging to former employees or contractors. Past incidents have shown that failing to revoke these accounts can lead to data breaches.
Use "last login" timestamps and application logs to spot dormant accounts that haven’t been accessed in 30, 60, or 90 days. Monthly campaigns targeting users who haven’t logged into sensitive systems, such as production environments, can help clean up inactive accounts. For example, in 2024, a U.S. healthcare provider discovered over 300 inactive employee accounts still had access to patient records during a User Access Review audit. This allowed them to revoke permissions and avoid HIPAA violations.
Permission errors can be subtle but dangerous. Compare current user privileges against your RBAC models to identify discrepancies. Pay attention to "direct grants" (permissions assigned individually) versus "inherited permissions" (assigned via groups), as these can reveal backdoor access paths. Modern IGA tools can flag high-risk anomalies, such as junior staff with admin privileges or users accessing sensitive data they never use.
To prevent these issues from recurring, integrate your review system with your HRIS. This setup can trigger automatic, event-driven reviews whenever an employee changes roles or leaves the organization. As Alex Simons, Corporate VP at Microsoft Identity, explains:
60% of access errors stem from outdated records not being cleaned up.
Don’t forget to review non-human identities like service accounts, API keys, and AI agents. These often hold excessive, long-standing permissions and are rarely audited. Search for application accounts that aren’t linked to any identity in your central directory (IdP), as these are often tied to former employees or forgotten integrations.
Centralizing Policies and Using Automation
Centralizing access policies is a game-changer for streamlining BI security, especially when paired with regular access audits. Managing permissions manually across tools like Power BI, Tableau, and Snowflake often leads to errors and security gaps. Without centralization, policies can become inconsistent across platforms. This is where Identity Governance and Administration (IGA) tools shine - they provide a unified approach to managing access policies while automation reduces repetitive tasks and the chance of human error.
Identity Governance and Administration (IGA) Tools
IGA tools simplify managing permissions by centralizing and standardizing policy enforcement across BI platforms. Instead of setting permissions individually for each tool, you can define access rules once and apply them universally. For instance, a marketing analyst in Chicago could access customer data seamlessly, whether working in Power BI or querying Snowflake.
One standout feature of IGA tools is Policy-Based Access Control (PBAC), which allows you to define access rules in straightforward language. For example, a policy might state that sales managers can view regional revenue data but exclude sensitive information like executive compensation. These rules are enforced automatically through mechanisms like Row-Level Security (RLS), role assignments, and database grants.
Modern IGA solutions integrate with identity providers like Azure AD or Okta, syncing user data directly from HR systems. When an employee is hired or their role changes, the IGA system can assign the right BI permissions within hours. This synchronization often uses SCIM (System for Cross-domain Identity Management) to keep user attributes, group memberships, and permissions aligned with your organization’s structure.
Dynamic membership rules further enhance access control by automatically updating user group assignments based on attributes like location or department. For example, if an employee transfers from the Boston office to Seattle, their updated location in Azure AD triggers a move to the correct regional access group. This proactive approach prevents "permission creep", where employees accumulate unnecessary access over time. Centralizing policies not only simplifies management but also sets the stage for more robust automation in BI security.
Automating Permission Changes
Automation transforms access management from a manual, reactive process into a proactive and secure system. Tools like Power Automate or AWS Lambda handle the entire permission lifecycle - from capturing user details and routing approvals to updating security groups. Automation also creates an auditable trail, which helps with compliance requirements like HIPAA, GDPR, and SOX.
Just-In-Time (JIT) access is another automation feature that enhances security by granting temporary permissions. For example, a contractor working on a three-month project might receive access to financial dashboards for only 90 days. Once the time is up, access is automatically revoked, minimizing the risk of unauthorized access.
Deprovisioning is one of the most critical automated processes. By integrating HR systems with BI platforms, access for terminated employees is revoked promptly - often within 24 hours. This is essential considering there are roughly 2,200 cyberattacks daily, or one every 39 seconds. Quick deprovisioning ensures that dormant accounts don’t become a security vulnerability.
Automation also secures new data assets as they are created. For example, in Snowflake, you can apply predefined permissions to new tables or schemas automatically. So, when a data engineering team adds a new customer analytics table, the appropriate roles gain access instantly, reducing risk.
| Automation Feature | Security/Efficiency Impact | Implementation Example |
|---|---|---|
| HR System Sync (SCIM) | Prevents access by former employees | Azure AD syncs with Workday to deprovision within 24 hours |
| Future Grants | Secures new data assets automatically | Snowflake applies RLS policies to new tables upon creation |
| Dynamic Group Rules | Roles update as users change | Azure AD moves users between regional groups based on location |
| Request Workflows | Creates audit trail and reduces errors | Power Automate routes approval requests and updates security groups |
For large-scale BI deployments, adopting an infrastructure-as-code approach can further enhance security. Using CI/CD pipelines and tools like AWS CDK, organizations can programmatically deploy security configurations. This "BIOps" methodology treats access policies as version-controlled code, ensuring they are tested and deployed automatically, reducing the risk of manual errors in configuration setups.
Monitoring Access with Auditing and Reporting
Once you’ve automated permission changes, the next step is to implement continuous monitoring. This ensures you can spot security gaps early. Continuous monitoring works hand-in-hand with automated permissions and regular reviews, giving you real-time insights into user activities. Auditing and reporting tools capture essential actions, such as viewing reports or modifying sensitivity labels, offering a clear view of how data moves through your system. This visibility is crucial when you consider there are over 2,200 cyberattacks each day - roughly one every 39 seconds.
While compliance plays a role in security, it’s not the whole picture. As the Verizon Data Breach Report puts it:
While compliance definitely helps drive security, compliance does not equal security.
To stay secure, you need both: an audit trail for regulatory purposes and real-time monitoring to catch suspicious behavior. For instance, in November 2022, Meta faced a $277 million fine after a significant data breach. Effective monitoring not only helps meet compliance but also provides the foundation for choosing the right tools to track and audit access.
Tools for Tracking User Access
Auditing tools come in several types, each serving specific needs:
-
Tenant-Level Auditing: Tools like Power BI Activity Log and Microsoft Purview monitor activities such as editing, sharing, and exporting across your BI environment. They capture high-risk events like
ExportReport,ShareReport, andUpdateRLSRoles. - Performance Tracing: Azure Log Analytics and SQL Server Profiler dive deeper, tracking low-level events like query execution and memory usage. These tools are invaluable for troubleshooting and optimizing DAX or Power Query formulas.
-
Behavioral Analytics: Tools like FullSession focus on user behavior and session replays, which are especially useful during sensitive processes like onboarding or identity verification. As Roman Mohren, CEO of FullSession, explains:
If a permission lets data leave the platform, treat it as higher risk than a permission that only lets someone view a chart.
This highlights the need to prioritize monitoring for bulk exports, API keys, and shared links - points where data can leave your control.
Automated alerts can further enhance monitoring. Tools like Power Automate can notify you instantly about administrative actions, such as new workspace creation or changes to tenant-level security settings. Organizations using automated auditing tools report a 37% reduction in compliance reporting time and fewer access discrepancies across multi-tenant BI systems.
| Tool Category | Specific Tools | Primary Use Case |
|---|---|---|
| Tenant-Level Auditing | Power BI Activity Log, Microsoft Purview | Tracking user activities (editing, sharing, exporting) across the environment |
| Performance Tracing | Azure Log Analytics, SQL Server Profiler | Troubleshooting semantic model performance and optimizing DAX queries |
| Metadata & Quality | Tabular Editor, DAX Studio | Auditing data model metadata and ensuring design best practices |
| Behavioral Analytics | FullSession, Microsoft Clarity | Monitoring user behavior and session replays for critical journeys |
| Cloud Data Platform | Snowflake ACCOUNT_USAGE Views | Tracking privileges for roles, users, and applications in a data warehouse |
Setting Up Compliance Reviews
Tracking user actions is only part of the equation - systematic compliance reviews ensure your logs meet regulatory standards. Since BI activity logs typically retain data for just 180 days, exporting them to permanent storage like Azure Log Analytics or a data lake helps maintain a full audit trail.
Quarterly access reviews are essential to prevent "privilege sprawl", where users accumulate unnecessary permissions as they change roles. Structured access hierarchies make compliance audits 31% faster compared to ad-hoc setups. During reviews, ensure access aligns with job functions and document any revocations.
It’s also vital to watch for patterns that indicate risks. For example, "silent privilege creep" happens when users retain old permissions after switching teams, while "shadow distribution" occurs when users recreate sensitive dashboards in external tools like no-code platforms or spreadsheets due to restrictive sharing policies. Monitoring spikes in report exports or executives accessing uncertified reports can reveal potential data leaks.
To maintain compliance, use metadata scanning to create inventories of sensitivity labels on a weekly or monthly basis. This ensures data protection policies are consistently applied. Organizations requiring mandatory sensitivity labels before saving content have eliminated unlabeled data entirely.
Finally, leverage adoption dashboards via BI admin APIs to track "stale content" - reports with no views in over 90 days. These reports can be archived or retired, reducing your attack surface and freeing up resources. Proper training for administrators can cut misconfiguration errors by 33%, proving that the human element is just as critical as the tools you use.
Applying These Practices to Specific BI Tools
Turning principles like RBAC (Role-Based Access Control), least privilege, MFA (Multi-Factor Authentication), and continuous monitoring into actionable configurations shows how these ideas play out in BI platforms. Power BI offers a clear example with its structured approach to access control.
Setting Up Workspace Roles in Power BI
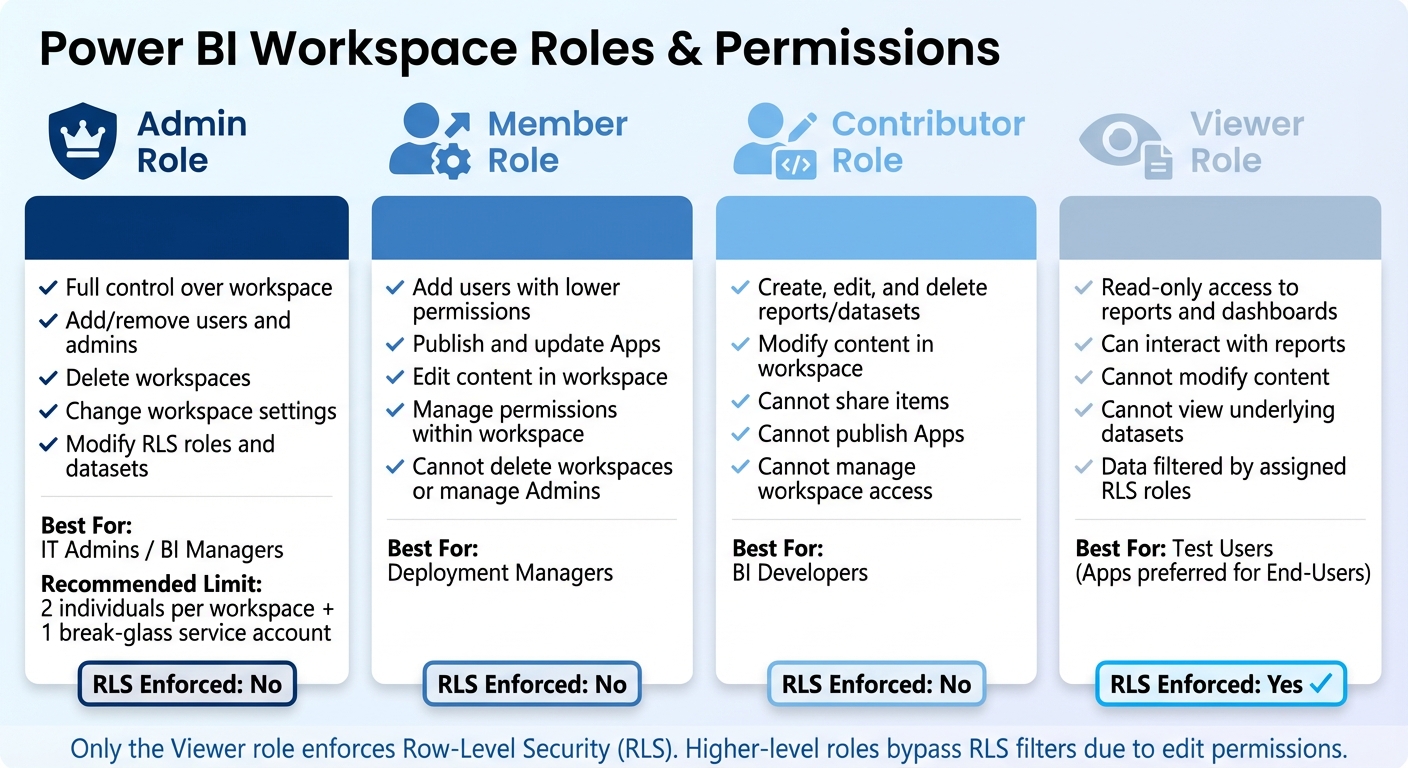
Power BI organizes access through four main workspace roles: Admin, Member, Contributor, and Viewer.
- Admins: Have full control, including the ability to add/remove users and delete the workspace.
- Members: Can edit content, publish apps, and manage permissions.
- Contributors: Can create and modify content but cannot share or delete items created by others.
- Viewers: Have read-only access to reports and dashboards. Importantly, only this role enforces Row-Level Security (RLS), as users with editing permissions bypass RLS filters due to their higher-level access to the data model.
To keep sensitive data secure, assign most users to the Viewer role, limiting higher-level access to those who truly need it. For instance, a large healthcare provider managed its Power BI environment by publishing apps and granting access at the app level instead of directly to workspaces. This approach tightened security while adhering to the least privilege principle.
Another helpful tip: Instead of assigning roles to individual email addresses, map them to Microsoft Entra ID security groups. This simplifies management as employees shift roles or leave the organization. Once roles are in place, the next step is implementing data boundaries through Row-Level Security.
Using Row-Level Security (RLS)
RLS ensures users see only the data they are authorized to access, based on their identity. It applies exclusively to the Viewer role and doesn’t restrict access to model objects like tables or measures. There are two main ways to configure RLS:
- Static RLS: Uses fixed filters in DAX (e.g.,
[Region] = "West") and works best when roles and data boundaries remain stable. - Dynamic RLS: Leverages DAX functions like
USERNAME()orUSERPRINCIPALNAME()to filter data based on the logged-in user. This requires a lookup or permissions table in the data model to map users to their permitted data.
For example, a financial institution used RLS to restrict access to specific rows in financial reports. By applying RLS filters to dimension tables instead of fact tables, they maintained strong query performance through relationship propagation.
Before rolling out RLS broadly, test roles using the "View As" feature in Power BI Desktop or the "Test as role" option in the Power BI Service. Keep in mind that if a user belongs to multiple RLS roles, the filters combine, showing the union of all permitted data.
| Workspace Role | RLS Enforced? | Permissions |
|---|---|---|
| Admin | No | Full control; can modify RLS roles and dataset settings |
| Member | No | Can edit content and manage permissions within the workspace |
| Contributor | No | Can create, edit, and delete content; cannot share items |
| Viewer | Yes | Read-only access; data is filtered by assigned RLS roles |
For DirectQuery sources like Azure SQL Database, Power BI can pass user identities via Single Sign-On (SSO) to the database, allowing the database to enforce its own RLS policies. Coordinating between the BI team and database administrators ensures these security measures align across both systems.
Conclusion
Summary of Best Practices
Managing BI user access is all about creating a layered security system that protects your data from every angle. The strategies outlined above work together to build a strong framework for managing BI user access effectively. Start with Role-Based Access Control (RBAC) to organize users based on their job roles. Then, enforce the Principle of Least Privilege to ensure users can only access the data they truly need. Add Multi-Factor Authentication (MFA) and Single Sign-On (SSO) for extra security, and use Row-Level and Object-Level Security to fine-tune data visibility.
Regularly review and audit access to catch changes as employees switch roles or leave the company. Companies that align with a CMMI Level 5 security framework report a 40% drop in data access-related audit issues. Centralizing policies with Identity Governance and Administration (IGA) tools and automating permission updates can reduce administrative effort and errors. Organizations using directory-based permissions for BI tools have seen a 36% reduction in "permission drift" incidents.
"Deploying Power BI without governance is like building a city without traffic rules." - Raju Easwaramoorthy, Technical Blog Author, Presidio
The stakes are high - recent multi-million-dollar fines highlight the risks of poor access management. With 2,200 cyberattacks happening daily - one every 39 seconds - strong access controls are no longer optional. By following these practices, organizations can take immediate steps to secure their BI environments.
Getting Started with Implementation
To put these ideas into action, start by auditing your user accounts and categorizing your data based on sensitivity. Identify dormant accounts and establish a security baseline. Within the first 30 days, limit workspace creation to a designated group and disable organization-wide "Publish to web." Implement mandatory sensitivity labels, configure export restrictions that align with those labels, and set up deployment pipelines to manage production analytics securely.
FAQs
What’s the fastest way to find and remove risky BI access?
The fastest way to tackle risky BI access is to start with a permissions audit. This helps identify any vulnerabilities and allows you to quickly adjust or revoke access for users who have more privileges than they need. Using role-based access control (RBAC) can make managing permissions much easier by organizing users into specific roles based on their responsibilities. To keep things secure long-term, regularly audit and monitor activity logs. This approach prevents "permission creep" and ensures that access stays appropriate and secure as time goes on.
How do I prevent permission creep when people change roles?
When roles evolve within an organization, it's easy for outdated permissions to pile up - this is known as "permission creep." To keep things secure and efficient, it's important to stay on top of access management. Here’s how:
- Conduct regular audits: Periodically review access permissions to identify and remove outdated or unnecessary privileges. This ensures that no one has access they shouldn't.
- Automate role management: Automating the process of assigning and updating roles reduces the chance of human error. It also streamlines the process when responsibilities shift.
- Monitor activity logs: Keeping an eye on activity logs helps detect unusual behavior or unauthorized access early on.
- Remove unused roles: Eliminate roles that are no longer needed, preventing them from becoming a security risk.
- Align permissions with responsibilities: Ensure that access permissions match an individual's current role and duties to minimize exposure to potential threats.
By staying proactive, you can maintain a secure environment while reducing unnecessary risks.
Which BI actions should I audit and alert on first?
To keep your BI environment running smoothly, start by focusing on three key areas: data refresh failures, capacity performance, and user access permissions. Regularly auditing these aspects and setting up alerts can make a big difference. Why? Because they’re essential for maintaining accurate data, ensuring systems perform well, and safeguarding access. By tackling these early, you can catch potential problems before they grow into bigger issues.