Building custom connectors no longer requires coding expertise, thanks to modern low-code platforms. With platforms like Airbyte and Microsoft Power Apps, you can connect APIs to your systems in minutes using simple, visual no-code tools. Here's how it works:
- Custom connectors allow seamless integration with APIs that don’t have prebuilt solutions.
- Platforms like Airbyte and Power Apps simplify the process with drag-and-drop interfaces and automated features like retries, pagination, and authentication.
- Tasks that once took days or weeks can now be completed in as little as 10 minutes.
Key Steps:
- Choose a platform: Airbyte (data integration) or Microsoft Power Apps (business apps/workflows).
- Set up your workspace: Create accounts, configure environments, and gather API credentials.
- Configure your connector: Define API endpoints, authentication, and data streams.
- Test and deploy: Validate functionality, ensure security, and move to production.
These platforms make it easy to connect internal systems, legacy databases, or third-party services without technical expertise. Whether you're building for business workflows or data pipelines, this guide walks you through the essentials.
Create a Custom API Connector in Power Apps
sbb-itb-3a330bb
Prerequisites and Setup
Before diving into building custom connectors, make sure you have access to the necessary platforms and the target API's documentation. Two popular no-code tools for this task are Airbyte and Microsoft Power Platform. Airbyte Cloud offers a 30-day free trial without requiring a credit card, while Microsoft provides a free Developer Plan that allows individuals to build and test connectors in a sandbox environment.
You'll also need API credentials for the service you want to connect to. This typically involves registering for an API key or setting up OAuth tokens through the provider's developer portal. For instance, if you're working with the Exchange Rates API - a common example for tutorials - you can sign up for their free tier to generate a test API key. Keep the API's documentation handy during the process to make development smoother.
Required Tools and Accounts
Selecting the right platform depends on your integration goals.
- Airbyte: Best for data integration and synchronization, especially when pulling data from REST APIs into data warehouses or databases.
- Microsoft Power Platform: Ideal for creating connectors that drive business applications and automate workflows.
Here’s what you’ll need for each:
- Airbyte: Create an account on Airbyte Cloud, or set up a self-managed instance if you prefer local deployment.
- Microsoft Power Platform: Set up a Power Apps or Power Automate account. If you're hosting APIs or need advanced security features, you’ll also need an Azure subscription tied to the same tenant.
Both platforms support common authentication methods like API keys, OAuth 2.0, and basic authentication. Before starting from scratch, check their existing catalogs - Airbyte offers hundreds, and Microsoft provides over 900 prebuilt connectors. You might find that the integration you need is already available, saving time and effort.
Setting Up Your Workspace
Once your accounts are ready, configuring your workspace is the next step. For Airbyte, log in and navigate to the Builder tab on the left sidebar. From there, select "Start from scratch" or "New custom connector" to access the visual configuration interface. If you’re running Airbyte locally using abctl, ensure you're not in "low-resource mode", as this disables the Connector Builder.
For Microsoft Power Apps, log in to the Power Apps maker portal and confirm that you’ve selected the correct development environment. Go to the Dataverse menu, choose Custom Connectors, and click "New custom connector." You can either start from a blank template or import an OpenAPI file if you already have one. Note that Power Platform supports only OpenAPI v2.0, so you’ll need to convert or recreate connectors designed for OpenAPI 3.x.
When configuring your workspace, avoid hardcoding sensitive credentials like API keys or passwords. Instead, use "Testing Values" during development. These temporary credentials won’t be saved to the production version of your connector. This approach ensures that when the connector is deployed, users will input their own secure credentials. With your workspace now set up, you’re ready to begin developing your custom connector.
How to Build Custom Connectors
You can build custom connectors in as little as 10 minutes. Both Airbyte and Microsoft Power Apps provide user-friendly interfaces that don't require programming expertise, often utilizing no-code and low-code tools, though their workflows differ. Let’s break down how each platform simplifies the process.
Using Airbyte Connector Builder
Airbyte's Connector Builder operates through isolated projects that stay separate from active connections until you're ready to publish. To get started, head to the Builder tab and click "Start from scratch." The interface relies on schema-driven forms to create a YAML manifest in the background, so you won’t need to interact with any code directly.
The key component here is defining streams, which function like database tables. Each stream is tied to an API endpoint and an HTTP method (commonly GET). For instance, if you’re building a connector for an Exchange Rates API, you might create a stream called "rates" pointing to the endpoint that delivers currency data. The real-time testing panel allows you to trigger API calls and review JSON responses instantly, making it easy to validate your setup.
Authentication is handled in the Inputs tab, where you can define fields like API keys or OAuth tokens. Sensitive credentials can be marked as "Secret fields", and the Shared Authenticator toggle lets you apply the same authentication settings across all streams. For development purposes, you can use Testing Values to temporarily store credentials - these won’t carry over to the production version, ensuring users input their own secure keys later.
For APIs with large datasets, the builder includes pre-built pagination options, such as limit-offset, page-number, cursor, or header link pagination. No custom logic is needed. If incremental syncs are required (where only new or updated records are fetched), you can define a Cursor Field like updated_at or date and specify the datetime format. The builder takes care of the rest.
Once your streams are configured and tested, head to the Schema tab to verify that the auto-detected data structure aligns with your expectations. When everything checks out, publish the connector to make it available as a Custom Connector in your Airbyte workspace.
Using Microsoft Power Apps

Microsoft Power Apps, on the other hand, uses a wizard-based approach to guide you through connector creation. Once your workspace is set up, navigate to the Power Apps maker portal, open Dataverse, select Custom Connectors, and click "New custom connector." You can start from scratch, import an OpenAPI file, or use a Postman collection.
In the General section, name your connector, upload an icon, and specify the API’s host and base URLs. The Security section lets you choose authentication methods like API Key, OAuth 2.0, or Basic Authentication. You can also specify whether API keys should be sent in the header or query string.
The Definition section is where you create Actions, which define what your connector will do. Each action needs a summary and a unique Operation ID, which you’ll later use in Power Apps formulas. Instead of manually writing JSON schemas, you can use the "Import from sample" feature - just paste a working URL, its headers, and a sample JSON response body. The wizard will automatically generate the data schema for you.
For example, in February 2024, a developer used this method to integrate the OpenWeatherMap API. They set up security with an API key in the header, defined a GET action for weather data, and imported a sample JSON response to map fields like temperature and city name. The connector was then used in a Canvas App to display real-time weather data through a simple formula.
If you’re looking for a no-code experience, you can skip the Code tab entirely - this is only for advanced C# transformations. Instead, move straight to the Test tab. Here, you’ll create a new connection with valid credentials and execute your operation. A "200 OK" status means everything is functioning properly. Keep in mind, it might take a few minutes for the connection to become test-ready after creation.
Configuring Your Custom Connectors
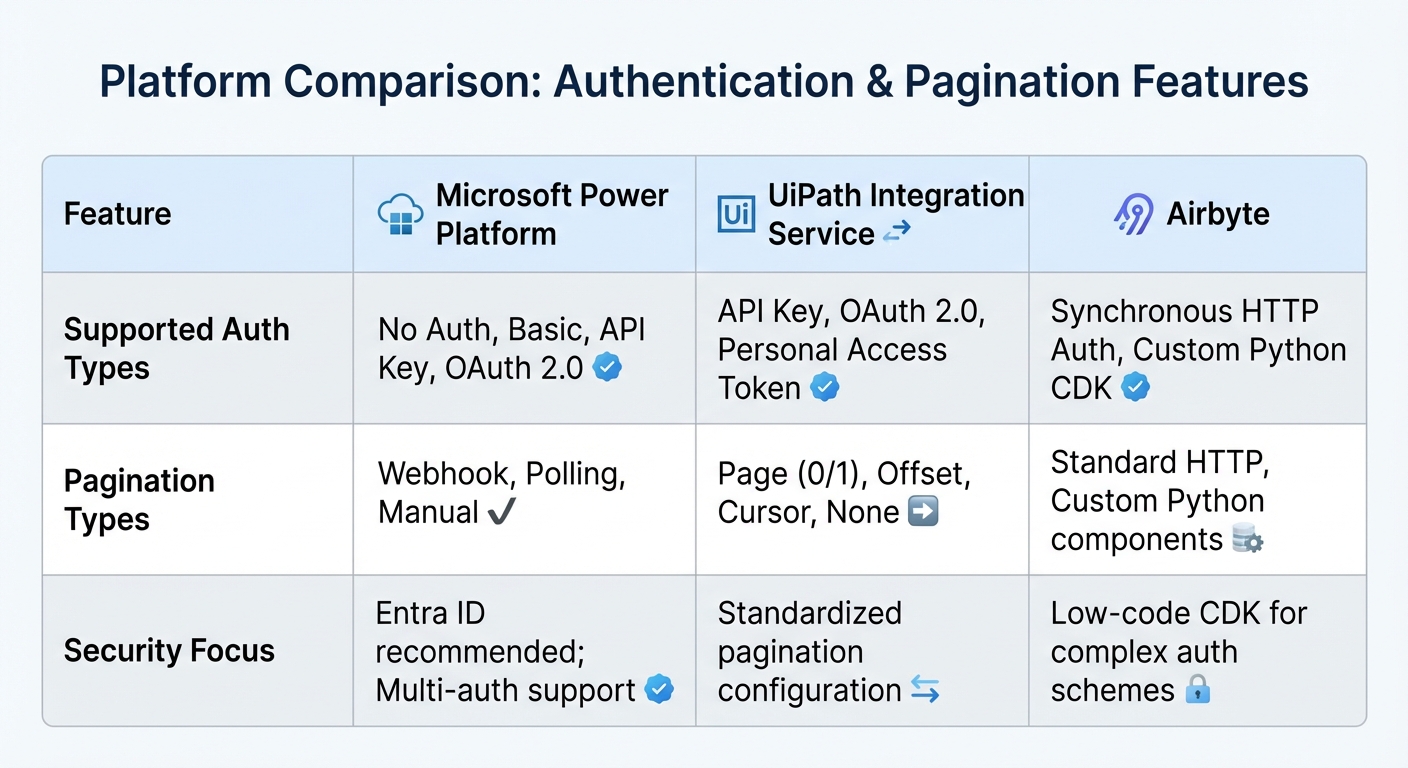
Airbyte vs Microsoft Power Apps: Custom Connector Platform Comparison
Authentication and Security Settings
After setting up the structure of your connector, securing it with the right authentication method is the next critical step. Most top low-code platforms provide four main authentication options: No Authentication (for public APIs), Basic Authentication (username and password), API Key Authentication (a static token), and OAuth 2.0 (token-based access).
Among these, OAuth 2.0 is widely regarded as the standard for enterprise-grade connectors because it avoids exposing raw credentials. For example, Microsoft Power Platform supports OAuth 2.0 with providers like Microsoft Entra ID, Google, and GitHub. Similarly, Airbyte offers synchronous HTTP authentication and custom schemes through its low-code connector development kit. If you're working in a Microsoft-focused environment, Entra ID is often the preferred choice.
"If your connector uses OAuth, it's important to regularly monitor and renew expiring client ID and client secret credentials... submit the connector update one month prior to the date your client ID and client secret are set to expire." - Microsoft Learn
For OAuth-based connectors, you’ll also need to configure redirect URIs to align with modern security protocols. Some platforms even offer Multi-Auth, letting users choose between API Key or OAuth authentication within a single connector. When implementing API Key authentication, you can decide whether the key should be sent in the header or query string - headers are generally preferred for enhanced security.
Once authentication is in place, the next step is to configure how your connector handles large datasets, focusing on pagination and data stream management.
Pagination and Data Streams
Handling large datasets efficiently is crucial, and that’s where pagination comes into play. Without proper pagination, you risk timeouts, incomplete data retrieval, and hitting API rate limits. Most no-code platforms simplify this process, allowing you to select a pagination strategy and map API parameters like offset, limit, or page to your connector’s fields.
The three most common pagination strategies are:
- Page Number: Uses a parameter like
?page=2. - Offset/Limit: Utilizes parameters such as
?offset=100&limit=50. - Cursor/Marker: Relies on a unique token from the previous response to fetch the next batch.
For example, UiPath’s Integration Service limits paginated responses to 2,000 results. Always consult your API vendor’s documentation to ensure the correct pagination logic is applied.
| Feature | Microsoft Power Platform | UiPath Integration Service | Airbyte |
|---|---|---|---|
| Supported Auth Types | No Auth, Basic, API Key, OAuth 2.0 | API Key, OAuth 2.0, Personal Access Token | Synchronous HTTP Auth, Custom Python CDK |
| Pagination Types | Webhook, Polling, Manual | Page (0/1), Offset, Cursor, None | Standard HTTP, Custom Python components |
| Security Focus | Entra ID recommended; Multi-auth support | Standardized pagination configuration | Low-code CDK for complex auth schemes |
In addition to pagination, data streams allow your connector to manage individual API endpoints, treating each as a separate dataset. For instance, in Airbyte, each stream corresponds to a specific API endpoint and HTTP method. If your connector needs to track changes over time, you can enable Incremental Sync by defining a cursor field (e.g., updated_at or id). This ensures only new or updated records are fetched during subsequent synchronizations.
When testing pagination, it’s a good idea to set a "Max Records" or "Max Pages" limit during initial runs to avoid infinite loops. Use the test panel to verify that the next-page token or URL is being correctly identified. Tools like Data Fetcher offer a "Fetch all pages" option, which automatically retrieves the full dataset until no more records are available.
Testing and Deploying Your Connectors
Testing Your Connectors
Before launching your connector, it's crucial to ensure it performs as expected. Both Airbyte and low-code development platforms like Power Platform offer built-in tools to validate your connector through unit, integration, and regression testing. For Power Platform connectors, start by validating your OpenAPI (Swagger) schema using swagger-cli. Then, use paconn-cli to check if your connector is ready for certification.
Make sure the connector's authentication works properly, confirm that all data streams are detected, and verify that the output records align with the schema. For connectors with advanced functionality, test sync modes like full refresh (sequential data reads) and incremental syncs (retrieving only new data using states or cursors).
If you encounter issues, tools like the airbyte-ci CLI can help you run the entire test suite locally before deployment. In Power Apps, you can inspect response bodies and status codes when troubleshooting. Always perform tests in a sandbox or developer account to avoid affecting production data. Additionally, if you modify an API field in a Power Platform connector, you’ll need to republish the connector, remove existing connections in your apps, and reconnect them to apply the changes.
Once all tests are successful, you’re ready to move forward with deployment.
Deploying to Production
After thorough testing, the next step is deploying your connector to production. For Microsoft Power Platform, package your custom connectors along with apps and flows into Solutions. This method supports managed CI/CD processes and streamlines migration between environments. Deploy connectors via Solutions and verify their functionality in a dedicated test environment. To track changes, download and version your connector definitions in Git.
Reapply authentication and security settings as outlined during configuration. Store API keys securely in secrets managers, and for OAuth-based connectors, confirm proper handling of token refreshes and secure storage. Double-check the visibility settings - connectors in Power Apps may fail in published apps if their privacy isn't set to "Public" or if required role assignments are missing. Keep in mind that when migrating connectors through Solutions, credentials won’t transfer automatically. You’ll need to re-enter them and recreate connections in the target environment.
Lastly, set up monitoring dashboards to track metrics like processing rates, errors, and data freshness. This proactive approach helps you detect and resolve issues before they affect end users.
Conclusion
Building custom connectors without writing code has revolutionized how we approach data integration. Tasks that once took weeks of manual effort can now be completed in as little as 10 minutes, thanks to no-code platforms that manage retries, stream slices, checkpoints, and input validation seamlessly.
"The connector builder has been a true unlock for our backend piping across many dimensions: Speed, efficiency, reliability and ease of use. It has enabled us to convert endless lines of self-build python ETL scripts... into beautiful airbyte connectors that just works."
- Tobias Troelsen, Chief Analytics Officer at Capturi
This quote highlights the real-world impact of these tools, showcasing their ability to streamline processes and enhance efficiency. Whether you're using Airbyte's connector builder or Microsoft Power Apps, the steps remain straightforward: define API endpoints, configure authentication, establish data streams, and thoroughly test everything before deployment. Following no-code best practices not only simplifies maintenance but also minimizes technical debt.
For a deeper dive into platforms that can support your custom connector needs, visit the Best Low Code & No Code Platforms Directory at https://lowcodenocode.org. The directory offers detailed comparisons across tools for analytics, automation, development, and more, helping you choose the best fit for your projects.
FAQs
Which platform should I choose: Airbyte or Power Apps?
Choosing between Airbyte and Power Apps comes down to what you're looking to achieve. If you need to create flexible data integrations and pipelines, Airbyte's no-code Connector Builder is a solid choice. For more advanced requirements, its low-code tools allow you to handle complex connectors effectively.
On the other hand, Power Apps is designed for building custom connectors within the Microsoft ecosystem. This makes it ideal for businesses that rely heavily on Microsoft tools and want seamless integration with their existing systems.
Ultimately, your decision should align with your integration needs and the platforms you prefer to work with.
What API details do I need before I start?
Before diving into building a custom connector, it's crucial to collect some essential API details. Start with the API documentation - this will outline the endpoints and data schemas you'll be working with. You'll also need an API key or other authentication credentials to access the API.
Make sure to identify the request methods (like GET or POST) and any required headers for your requests. Lastly, confirm the expected response format (such as JSON or XML) to ensure everything is set up for seamless data exchange with the API. Having these details upfront will save you time and avoid potential headaches later.
How do I handle pagination and incremental updates?
When managing pagination, set up your connector to use cursor-based pagination. This involves leveraging a specific key from the API response to pull the next set of data.
For incremental updates, rely on timestamp fields or similar methods. These allow you to fetch only the new or updated records since the last retrieval. This approach ensures efficient data handling, keeps your connector current, and reduces unnecessary data transfer.