Losing data in no-code apps can disrupt your business. Whether it's accidental deletion, automation errors, or integration glitches, the impact can be severe. For small businesses, a single data loss incident costs an average of $18,000, and 60% shut down within six months after losing critical data. Larger enterprises face downtime costs of up to $5,600 per minute.
The good news? Many no-code platforms offer user-friendly recovery tools like restore buttons, version histories, and snapshots. These features make it easier to reverse mistakes without needing technical expertise. To protect your data, you need a solid backup strategy, regular testing, and an understanding of platform-specific recovery methods.
Key takeaways:
- Backup tools: Platforms like Bubble, Airtable, and Webflow provide automated snapshots and manual savepoints.
- Retention limits: Backup history varies by subscription level (e.g., Bubble's free plan retains 6 hours, while Airtable's free plan keeps 2 weeks).
- Restoration methods: Some platforms overwrite existing data (Bubble), while others create a new copy (Airtable).
- Prevention tips: Use external backups (e.g., Google Drive, AWS) and follow best practices like the 3-2-1-1-0 rule (3 copies, 2 storage types, 1 offsite, 1 immutable, 0 errors).
A reliable recovery plan ensures you can restore data quickly and minimize disruptions, even in the worst-case scenario. Let’s dive into the details.
Restore a Data Field in Your Bubble.io No Code Web Apps When You Accidentally Delete It
sbb-itb-3a330bb
Backup Options in No Code Platforms
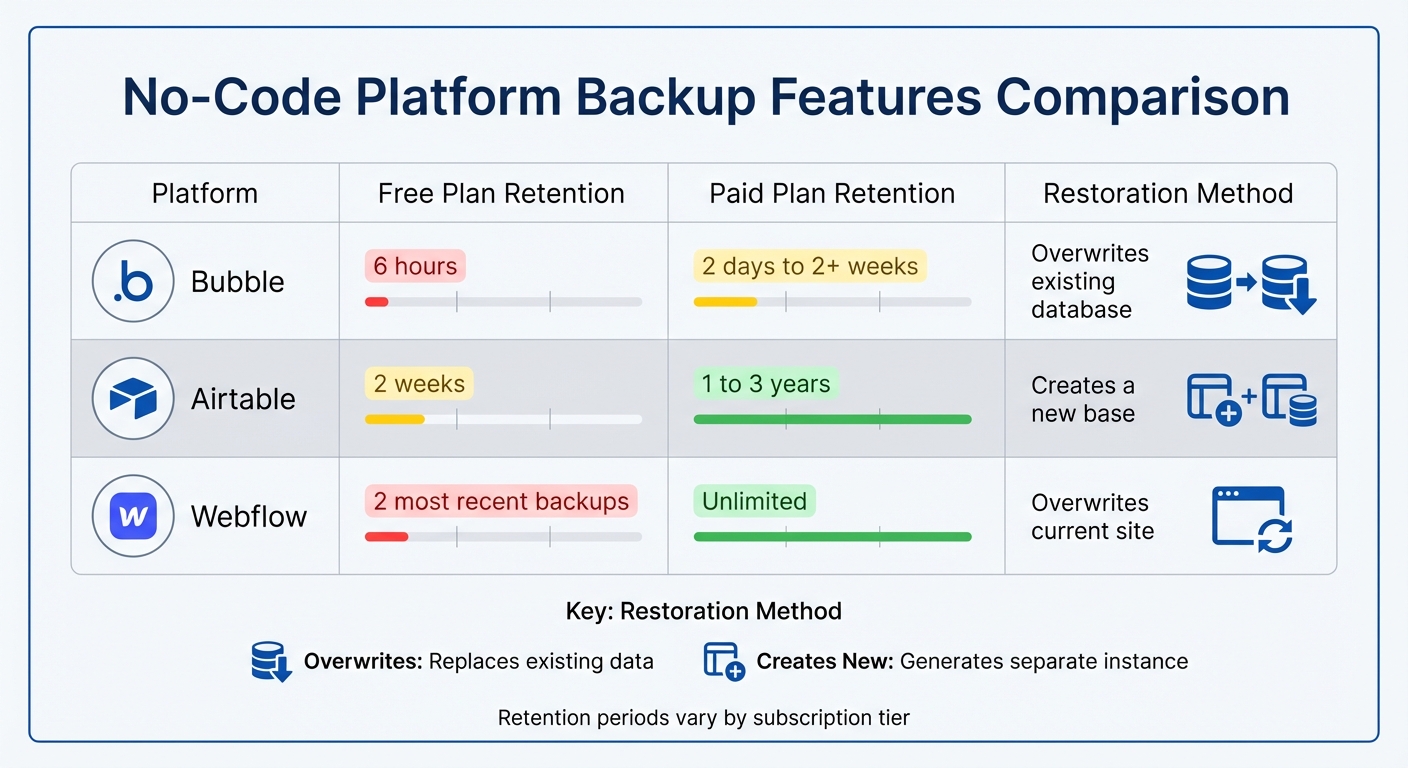
No-Code Platform Backup Features Comparison: Bubble vs Airtable vs Webflow
No-code platforms come with distinct backup methods designed to protect your data before something goes wrong. Knowing how these backups work is crucial for setting up a dependable recovery plan.
Backup Features in No Code Tools
Most no-code platforms rely on automated snapshots to periodically save the state of your application. For example, Bubble uses point-in-time backups to log every change, allowing you to restore your app to a specific moment in time. This feature is particularly useful for undoing changes to workflows or designs without disrupting your entire database.
Airtable, on the other hand, offers base snapshots that capture the entire base - including tables, views, automations, and interfaces - based on activity levels. Airtable automatically generates at least one snapshot daily for active bases, and users with Editor or Creator permissions can create additional snapshots manually, with only a short wait time between saves.
Where these platforms differ most is in how they handle restoration. Bubble replaces your current database with the backup version, while Airtable creates a completely new base, leaving your original untouched. This difference is important when deciding whether you need a full rollback or just want to reference older data.
Retention periods also vary depending on your subscription level. For instance, Bubble’s free plan offers just 6 hours of backup history, while the Starter plan ($32/month) extends that to 2 days, and the Growth plan provides up to 2 weeks. Airtable’s retention spans range from 2 weeks on the free tier to as long as 3 years for Enterprise users.
| Platform | Free Plan Retention | Paid Plan Retention | Restoration Method |
|---|---|---|---|
| Bubble | 6 hours | 2 days to 2+ weeks | Overwrites existing database |
| Airtable | 2 weeks | 1 to 3 years | Creates a new base |
| Webflow | 2 most recent backups | Unlimited | Overwrites current site |
Understanding these features helps you choose the right platform for your needs, but proper setup and testing are just as important.
How to Set Up and Verify Backups
Once you’ve activated built-in backup features, take the next step by configuring and testing both manual and automated savepoints. Before making risky updates, create manual savepoints to act as safety nets. In Bubble, for example, you can use the "Create a Savepoint" feature and name it descriptively, like "Pre-automation-update-03-18-2026", so you can easily locate it later. Webflow users can press Control + Shift + S to manually save a restore point before starting major design changes.
Regular testing of backups is a must. Schedule practice restores every 3 to 6 months in a staging environment to ensure your backups meet your Recovery Time Objective (RTO) and Recovery Point Objective (RPO). Webflow simplifies this process by letting you preview backup versions in a new tab before committing to a restore using the "eye" icon. For Airtable, check the "Snapshots" section under the base history icon to confirm that automatic snapshots are being created as expected.
"A disaster recovery plan isn't truly effective until it's tested. Without validation, you're relying on assumptions - and in a crisis, untested assumptions often lead to failure." - Datto
In addition to platform backups, consider exporting your data to external storage solutions such as Google Drive, Dropbox, or AWS S3. This adds an extra layer of protection. Tools like PlanB for Bubble ($49/month) or On2Air for Airtable can automate these exports, ensuring you always have an offsite copy. Following the 3-2-1-1-0 rule - 3 copies of your data, stored on 2 different media types, with 1 offsite, 1 immutable, and 0 errors after verification - provides a robust safety net even if your platform experiences an outage.
How to Restore Data Step-by-Step
With your backups confirmed, here's how to restore your data while minimizing disruptions to live operations. Keep in mind that the process may differ depending on the platform you're working with.
Finding the Backup or Version History
Bubble separates backups into two categories: version control and database backups. For version control (like workflows or design elements), head to the top menu in the editor, click on the branch name, and select the "History" tab. For database backups, go to the "Data" tab, open the "App data" section, and click the "Copy and restore database" link.
Airtable consolidates its backup tools in one place. Click the History icon (a clock symbol) to access "Trash" and "Snapshots". For deleted bases or workspaces, click your profile icon on the home screen and choose "Trash". If you need to track changes at the record level, open a specific record to review its cell-level revision history.
| Platform | Feature | Location in Interface |
|---|---|---|
| Bubble | Version/Branch History | Top Menu > Branch Name > History Tab |
| Bubble | Database Backups | Data Tab > App Data > Copy and restore database |
| Airtable | Base Trash/Snapshots | Top Right > History Icon |
| Airtable | Workspace Trash | Home Screen > Profile Icon > Trash |
Before committing to a full restoration, check the Trash. In Airtable, items deleted within the last 7 days can often be recovered immediately without restoring an entire snapshot. For Bubble users, it's a good practice to create Savepoints with clear, descriptive names before making significant changes.
Once you’ve pinpointed the correct backup, you can move on to restoration.
Choosing and Restoring a Backup
The restoration process differs between platforms. Bubble overwrites your current data, while Airtable creates a new base. This difference allows you to choose based on your specific needs. If you're using Bubble, selecting "All types" ensures that relationships and app logic are preserved. Bubble's documentation cautions:
"Be cautious when you restore only one data type, as it can lead to data inconsistencies if some things are related. Sometimes it's better to still restore all to make sure that no relationships are lost."
Airtable’s method is less risky for experimentation. It creates a new base, leaving the original untouched, so you can compare the two side-by-side before deciding which to keep. However, note that Airtable snapshots generate a new Base ID, which means you'll need to update any external integrations and API connections or hardcoded links referencing the old ID. As Airtable Support explains, "The only ID that will change is the Base (aka 'app') ID, since a new base is created when using snapshots to restore a base".
After restoring the backup, double-check that all data and relationships remain intact.
Checking Data After Restoration
Once the restoration is complete, confirm that your data relationships and logic are functioning as expected. In Bubble, restoring specific data types without considering interconnections can disrupt app functionality. Abhinav Narain from Bubble highlights this risk:
"Restoring a backup of either database (especially the live one) initiates a heavy - and potentially disruptive - process with wide-reaching consequences on the infrastructure of your app".
To ensure everything is in order, run test queries. Use your app's search and filter tools to verify data accuracy. For Airtable, clear any active filters or sorts that might obscure records. Sorting entries by "Date Created" or "Last Modified" can help you locate specific data. If something appears missing, it could simply be hidden by view settings rather than actually lost.
Finally, update any external integrations to reflect changes, such as new Base IDs in Airtable or altered workflow logic in Bubble.
How to Recover Data Without Backups
When traditional backups aren't available, there are still ways to recover your data. The right method depends on the source of your data and the size of the dataset. Below, we’ll dive into using export/import methods and APIs to retrieve lost information.
Exporting and Re-Importing Data
If your no-code app is linked to an external source like Google Sheets, built-in tools might save the day. One standout feature is Google Sheets' Version History, which automatically stores snapshots of your document over time.
"Version History is arguably the most powerful data recovery tool in Google Sheets. It automatically saves periodic 'snapshots' of your entire document over time."
Instead of restoring an entire previous version (and risking the loss of more recent updates), you can preview earlier versions. From there, copy the specific missing cells and paste them back into your current sheet. For even more granular recovery, right-click a cell and choose "Show edit history" to see past changes and values.
Platforms like Glide also support data recovery through CSV, XLSX, or ODS file imports. Glide Certified Expert Robert Petitto highlights the value of this approach:
"Custom software... is most useful when it is populated with rich, specific company data. You can use these CSV uploads to get critical data from siloed software and databases and into a wide variety of custom apps."
Before importing files, it’s a good idea to create a temporary "Staging" or "Import" table. This allows you to validate headers and ensure the data structure matches your app's requirements. For smaller datasets (under 100 rows), manual updates may suffice. For larger datasets (over 1,000 rows), API-based recovery is a more efficient option.
If exporting and importing manually isn’t feasible, APIs can streamline the recovery process.
Using APIs for Data Recovery
APIs provide a programmatic way to read and write data, making them a powerful tool for restoring lost records. Simone Smerilli, a Softr Certified Expert, explains:
"APIs (application programming interfaces) allow you to create automations by programmatically reading and writing data within applications."
For handling larger datasets, advanced APIs like Glide API v2 can process up to 2,000 records in about 20 updates - far faster than manual methods. When working with APIs, it’s essential to map the recovery source headers to the app’s internal Column IDs rather than their human-readable names.
Automation tools like Zapier can also play a role. Elena Alston from Zapier notes that their "Transfer" feature enables bulk data movement from one app to another - even for data created before the automation was set up. Additionally, you can create Zaps that sync table data with other apps, effectively creating a live backup for rebuilding lost datasets. Keep in mind, though, that CSV downloads from Zapier Tables are capped at 50MB and only include currently visible records.
Before reintroducing recovered data to your live app, use "Get rows" API calls to pinpoint which records are missing or corrupted. For very large datasets, break API calls into chunks of 500 rows to avoid timeouts. This ensures the recovery process runs smoothly, even with extensive data.
How to Prevent Data Loss
Restoring lost data is important, but stopping data loss before it happens is smarter and more reliable. The stakes are high - 93% of companies without a disaster recovery plan shut down within a year after a major data loss event.
Setting Up Automatic Backups
Relying on manual backups is risky. Lindsay Smith, Creator of PlanB Backups, emphasizes this point:
"Manual backups will eventually fail. Automate everything to ensure your data is protected without relying on human memory".
Besides being unreliable, manual backups are expensive. They can cost 25 to 30 hours of labor every month, translating to $1,250 to $3,750.
To automate effectively, start by defining two critical metrics: your Recovery Point Objective (RPO) - how much data loss you can tolerate - and your Recovery Time Objective (RTO) - how quickly you need to get back online. These metrics guide your backup schedule.
Most no-code and low-code platforms include built-in backup features, but their retention periods vary. For example:
- Bubble.io: 6-hour backups on the Free plan, 2 days on Starter, and 2 weeks on Growth plans.
- Airtable: 2-week snapshots on the Free plan, 1 year on Team, 2 years on Business, and 3 years on Enterprise.
For more comprehensive coverage, services like PlanB Backups offer automated backups for $49/month, regardless of app size.
You can also set up recurring backend workflows to export data using external APIs or storage services. Enable version control within your platform to allow for precise restoration of specific versions or complete database recovery when necessary [5,27].
Testing your backups regularly is just as important as setting them up. Follow the 3-2-1-1-0 Rule:
- Keep 3 copies of your data.
- Use 2 different media types for storage.
- Store 1 copy offsite and 1 copy offline or immutable.
- Ensure 0 errors during verification.
To stay prepared, consider running a single table restore test monthly, a full disaster recovery drill quarterly, and an annual business continuity test.
Once your automated backups are in place, focus on diversifying your storage to avoid a single point of failure.
Storing Backups in Multiple Locations
Automation alone isn’t enough. If all your backups are stored in one location, you’re still vulnerable to major risks like platform outages, security breaches, or technical failures that could wipe out both live data and backups simultaneously.
To avoid this, spread your backups across multiple storage types:
- Cloud object storage like AWS S3 or Google Cloud.
- External databases such as Supabase or PostgreSQL.
- Consumer services like Google Drive or Dropbox [3,4].
By diversifying storage between your platform, cloud services, and external databases, you reduce the risk of platform lock-in and human errors [4,31].
For enterprise-level applications, where downtime can cost as much as $5,600 per minute, consider using immutable storage. Solutions like "Object Lock" or "WORM" (Write Once, Read Many) models ensure that backups cannot be deleted or altered - even by administrators. This is critical, especially since 68% of backup repositories are targeted in ransomware attacks.
To strengthen your prevention strategy:
- Set up real-time monitoring for backup failures, data anomalies, and storage limits.
- Configure deletion settings to manage costs while staying compliant with regulations like GDPR or HIPAA [4,7,28].
Investing in multi-location storage adds an extra layer of security, protecting your business from the devastating consequences of permanent data loss. The cost of these measures is small compared to the potential financial and operational impact of losing your data.
Conclusion
Data loss in no-code apps poses a serious risk to businesses. With the average cost of a data breach hitting $4.45 million, operating without a disaster recovery plan can lead to catastrophic consequences.
Recovery becomes manageable when proper systems are in place. Start with your platform's built-in tools, like version history and trash bins, for quick resolutions. For larger-scale issues, automated backups stored across multiple locations are essential. However, keep in mind that 68% of backup repositories are targeted by ransomware attacks. This makes immutable storage a critical safeguard, ensuring you have a clean recovery point.
While recovery tools are vital, prevention should always come first. As Datto emphasizes:
"A disaster recovery plan isn't truly effective until it's tested. Without validation, you're relying on assumptions - and in a crisis, untested assumptions often lead to failure".
Make it a habit to test your backups every 3–6 months to confirm they work and align with your business continuity goals. Additionally, clearly define your Recovery Point Objective (RPO) and Recovery Time Objective (RTO) to shape your backup strategy effectively.
The cost of setting up strong backup systems is minimal compared to the financial and operational damage of data loss. Whether you use built-in platform features or third-party tools like PlanB Backups, which costs $49/month, investing in data protection now can save your business from devastating setbacks. This proactive approach ensures your no-code app remains resilient and your operations stay uninterrupted.
For more guidance on selecting no-code platforms with robust data protection features, check out the Best Low Code & No Code Platforms Directory.
FAQs
What should my RPO and RTO be for a no-code app?
RTO - short for Recovery Time Objective - represents the maximum amount of downtime your application can endure before it must be restored. For highly critical applications, this could mean just a few minutes. Less critical ones might allow for hours or even up to a full day of downtime.
RPO, or Recovery Point Objective, focuses on acceptable data loss. This is directly tied to how often backups are performed. For instance, if you back up data once a day, you risk losing up to 24 hours' worth of data. More frequent backups can significantly reduce this risk.
How do I restore data without breaking integrations?
Restoring data in no-code apps can be tricky, especially if you want to avoid breaking integrations. A key tip? Don’t restore backups that alter IDs. Why? Many tools like Zapier or Airtable rely on consistent IDs to keep everything running smoothly. Changing them can throw your entire system into chaos.
Instead, consider using external systems to manage IDs separately. Another smart move is to take advantage of platform-specific features designed for safe restoration. For instance, Bubble offers versioning, and Airtable provides snapshot tools. These options let you recover data while keeping integrations intact.
The bottom line: Always go for strategies that protect the integrity of your integrations during the recovery process.
When should I use a full restore vs restoring specific records?
When you need to recover an app's entire data and settings - like after significant data loss, corruption, or a system failure - a full restore is the way to go. This process rolls the app back to a previously backed-up state, effectively resetting everything to that point.
On the other hand, if only specific entries are affected, you can opt to restore specific records. This method lets you recover just the impacted data without touching the rest. Typically, this is done using APIs or export/import tools, provided your platform supports these features.