Payment gateway plugins are essential tools for online stores, enabling secure and efficient payment processing. They connect your e-commerce platform with financial networks, allowing customers to pay using credit cards, digital wallets, and other methods. Without them, completing transactions would be impossible.
Key Takeaways:
-
Integration Types:
- Direct (on-site): Keeps the payment process on your site, improving conversion rates but requiring strict security measures.
- Redirect (off-site): Sends customers to an external page (e.g., PayPal) to complete payments, then redirects them back.
-
Why They're Important:
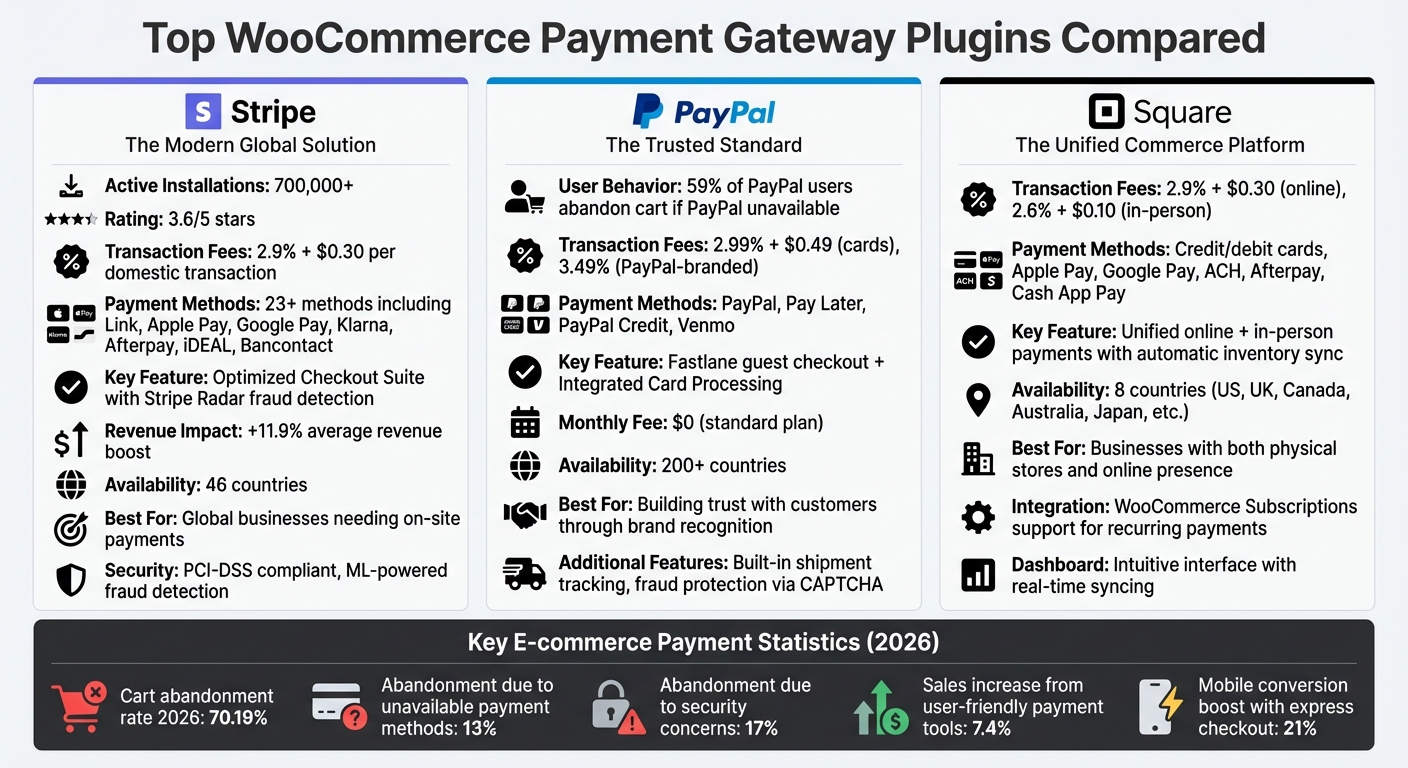
- 70.19% cart abandonment rate in 2026, with 13% abandoning due to unavailable payment methods and 17% due to security concerns.
- Top no-code tools for payments can increase sales by 7.4%, and express checkout options like Apple Pay can boost mobile conversions by 21%.
- Top WooCommerce Plugins:
-
Setup Steps:
- Install and activate the plugin via WordPress. You can find similar no-code and low-code tools to extend your site's functionality.
- Configure API credentials for secure communication.
- Test transactions in sandbox mode to ensure functionality.
-
Best Practices:
- Prioritize security (PCI DSS compliance, HTTPS).
- Offer multiple payment methods to suit customer preferences.
- Simplify the checkout process to reduce abandonment.
Quick Comparison of Top Plugins:
| Plugin | Key Features | Transaction Fees | Best For |
|---|---|---|---|
| Stripe | On-site payments, fraud detection | 2.9% + $0.30 per domestic | Global businesses |
| PayPal | Pay Later, Venmo, shipment tracking | 2.99% + $0.49 (cards) | Trust-building with customers |
| Square | Syncs online & in-person sales | 2.9% + $0.30 (online) | Physical + online stores |
Choosing the right payment gateway plugin ensures smoother transactions, reduces cart abandonment, and supports growth in e-commerce.
8 Best WooCommerce Payment Gateways + How to Set Up Payment Methods
sbb-itb-3a330bb
Best Payment Gateway Plugins for WooCommerce
Top WooCommerce Payment Gateway Plugins Comparison: Stripe vs PayPal vs Square
When it comes to WooCommerce payment gateways, Stripe, PayPal, and Square stand out as top choices. Each caters to different business needs while making the checkout process smoother. For example, Stripe boasts over 700,000 active installations and offers a seamless on-site checkout experience. Research also shows that 59% of PayPal users might abandon their cart if PayPal isn't an option. Square, on the other hand, is perfect for businesses with both physical and online stores, thanks to its ability to sync inventory and sales data automatically. Here's a closer look at what makes these plugins worth considering.
Stripe for WooCommerce
Stripe is known for its Optimized Checkout Suite, which supports fast on-site payments through options like Link, Apple Pay, and Google Pay. It accommodates over 23 payment methods, including credit cards, Buy Now/Pay Later solutions like Klarna and Afterpay, and local payment options such as iDEAL and Bancontact. This streamlined checkout process has been shown to boost revenue by an average of 11.9%.
Security is a strong point for Stripe, thanks to Stripe Radar, a fraud detection tool powered by machine learning. It also ensures PCI-DSS compliance through Stripe Elements. For businesses needing in-person payment options, Stripe offers solutions like Terminal M2 card readers and Tap to Pay on mobile devices.
Stripe is free to install in 46 countries, with standard fees of 2.9% + $0.30 per domestic transaction. It holds a 3.6/5 rating on the WooCommerce Marketplace. While users appreciate the easy Stripe Connect setup, some have noted occasional update-related issues.
PayPal for WooCommerce
PayPal's plugin is designed for quick and easy transactions, featuring tools like Fastlane guest checkout and Integrated Card Processing. Beyond standard PayPal payments, it supports PayPal Pay Later, PayPal Credit, and Venmo (in select regions). It also simplifies operations with built-in shipment tracking, fraud protection via CAPTCHA, and the ability to manage refunds from your WooCommerce dashboard.
PayPal's transaction fees are 2.99% + $0.49 for card payments and 3.49% for PayPal-branded transactions. There’s no monthly fee for the standard plan, and the plugin works in over 200 countries. Its strong brand recognition builds trust with shoppers, making them more likely to complete their purchases when using PayPal credentials.
Square for WooCommerce

Square shines in its ability to unify online and in-person payments, making it a top choice for businesses with physical stores. When you sell a product at a physical register, your WooCommerce inventory updates automatically. Square supports a variety of payment methods, including credit and debit cards, Apple Pay, Google Pay, ACH transfers, Afterpay, and Cash App Pay. It also integrates seamlessly with WooCommerce Subscriptions for recurring payments.
Square charges 2.9% + $0.30 for online transactions and 2.6% + $0.10 for in-person sales. It operates in eight countries, including the US, UK, Canada, Australia, and Japan. Users often highlight its intuitive dashboard and efficient inventory syncing. However, if your business serves customers across a wide range of countries, Stripe or PayPal might be better options.
Each of these plugins brings its own strengths to the table, making them excellent choices to streamline your WooCommerce checkout process.
How to Install and Set Up Payment Gateway Plugins
Step 1: Installing the Plugin
To get started, head to Plugins > Add New in your WordPress dashboard. From there, you can search for the plugin by name (e.g., Stripe or PayPal) and click "Install Now", followed by "Activate." If you’ve received a ZIP file directly from the provider, go to Plugins > Add New > Upload Plugin to upload and install it.
Once installed, double-check under Plugins > Installed Plugins to confirm that the gateway isn’t already active. Also, make sure the plugin is compatible with your WooCommerce and WordPress versions to avoid potential issues. After activation, navigate to WooCommerce > Settings > Payments to enable the new gateway.
Next, you’ll need to configure API credentials to establish secure communication with the payment provider.
Step 2: Setting Up API Credentials
To connect your account, you’ll need to enter API credentials provided by your payment gateway. These typically include a Publishable Key (for client-side operations) and a Secret Key (for secure backend communication). You can find these keys in the developer section of your gateway provider’s dashboard. For example, Stripe lists them under the "Developers" tab.
Go to WooCommerce > Settings > Payments, click "Manage" next to your selected gateway, and input your API keys. Enable Test or Sandbox Mode to simulate transactions before going live. Also, confirm that your site uses an SSL certificate, as this is essential for secure payment processing. Don’t forget to set your default currency - for instance, USD ($) - to match your business needs.
"The secret key must never appear in client-side code." - Razorpay
Once the credentials are entered, test the setup to ensure everything is functioning smoothly.
Step 3: Testing Transactions
With the plugin installed and API credentials in place, it’s time to test the payment process. Use the sandbox or test mode provided by your gateway to simulate transactions. Most gateways, such as Stripe, offer test card numbers to help you verify the setup. For instance, 4242 4242 4242 4242 simulates a successful payment, while 4000 0000 0000 9995 triggers an "insufficient funds" error. Be sure to test various scenarios, such as expired cards, incorrect CVCs, and 3D Secure authentication, to confirm your checkout handles errors properly.
Check that test orders appear in WooCommerce > Orders with the correct statuses (like "Processing" or "Completed"). Verify that transactions are also recorded in your payment gateway’s dashboard. It’s crucial to test the entire customer experience - from adding items to the cart to receiving an order confirmation email. Finally, before fully launching, run a live transaction using a low-cost product to confirm that everything is working as expected in production mode.
Key Features and Best Practices
With installation complete, it's time to focus on improving performance and ensuring security.
Features to Look For
When selecting a payment gateway plugin, prioritize features like PCI DSS compliance, 3D Secure 2.0 authentication, and tokenization to replace sensitive card data with secure tokens. Fraud detection powered by AI is becoming the norm - take Stripe's Radar, for example, which uses machine learning to flag suspicious transactions in real time.
Offering a variety of payment methods is critical. Look for plugins that support credit and debit cards, digital wallets (like Apple Pay and Google Pay), Buy Now Pay Later (BNPL) options such as Klarna or Afterpay, and local payment methods. For instance, UPI processes over 10 billion monthly transactions in India, while iDEAL accounts for 70% of online payments in the Netherlands.
On-site, API-integrated checkouts tend to reduce cart abandonment compared to redirect-based systems. Features such as one-click payments and guest checkout are must-haves. Mobile optimization is equally important, as mobile devices drive 70% of e-commerce traffic. Without a mobile-friendly checkout, abandonment rates can soar by up to 85%.
Operational tools can significantly streamline your workflow. Features like real-time transaction tracking, automated refunds, and subscription billing save time and effort. If you sell internationally, multi-currency handling is essential, but keep in mind that cross-border transactions often come with hidden currency conversion fees ranging from 1.5% to 7.5% per transaction. Additionally, with subscription commerce growing by 437% between 2012 and 2024, having robust recurring billing options is increasingly important.
Once you've identified the right features, make sure your setup includes strong security measures.
Security Best Practices
Protecting customer payment data is non-negotiable. With 98% of merchants reporting at least one type of fraud in the past year - and online payment fraud projected to exceed $362 billion between 2023 and 2028 - security should be a top priority. Start by ensuring all transactions use HTTPS/TLS encryption. Avoid hard-coding API keys in your code; instead, store them securely in environment variables or similar solutions.
Keep WordPress, WooCommerce, and payment plugins up to date. The 2018 British Airways breach, which impacted over 400,000 customers and resulted in a £20 million fine, serves as a cautionary tale about the importance of adhering to PCI DSS standards. Regular penetration testing and vulnerability scans can help identify weaknesses before they are exploited.
Implement multi-factor authentication (MFA), such as biometrics or one-time codes, to reduce the risk of account takeovers. Use tools like Web Application Firewalls (WAF) and API rate limiting to block bot attacks and injection attempts. Only collect and retain essential customer data to minimize exposure in the event of a breach.
Performance Optimization Tips
A slow checkout process can drive customers away. Express checkout options like Apple Pay and Google Pay can cut mobile checkout times from over 30 seconds to under 5 seconds. With cart abandonment rates projected at 70.19% in 2026, a smoother checkout flow could increase sales by as much as 35%.
Simplify the checkout process by removing unnecessary steps. A one-page checkout can help achieve this. Be upfront about shipping costs and taxes - hidden fees are responsible for 48% of cart abandonments. Limit the number of payment options to avoid overwhelming customers. For instance, offering one card processor, one digital wallet, and one BNPL option can reduce choice paralysis. It's worth noting that 59% of PayPal users will abandon their cart if the PayPal button isn't available at checkout.
To improve performance, leverage caching strategies. Use dynamic caching for non-static resources, file-based caching for static HTML, and object caching (e.g., Memcached) for frequently queried database data. Additionally, minify JavaScript, HTML, and CSS files to reduce file sizes and server requests, ensuring a smoother checkout experience.
Troubleshooting Common Issues
Payment gateway plugins can sometimes run into problems that disrupt your checkout process. Quickly identifying and resolving these issues ensures your checkout stays functional.
Fixing API Errors
After setting up and testing your plugin, API errors might still arise. One common issue is authentication failures. If you see a 401 error or an "Invalid Credentials" message, double-check that your API keys and tokens are entered correctly, without any extra spaces. Also, make sure you’re not mixing sandbox and live credentials. If everything looks correct but the problem persists, the payment processor may have deactivated your keys for security reasons. In that case, generate new keys and update your plugin settings.
For HTTP 400 errors, the problem often lies with incorrect endpoints, while HTTP 200 errors may indicate improperly passed credentials.
To dig deeper, enable Debug Mode by navigating to WooCommerce > Settings > Payments. This feature logs raw API responses, which can help you identify specific issues like authentication errors, missing required fields (e.g., phone number or billing address), or unsupported currencies.
If you encounter "Invoice Failed" errors, check two things: the order amount might fall below the gateway's minimum threshold, or your store currency might not be supported by the processor. For blank pages during checkout, review your server’s error logs to pinpoint PHP fatal errors.
Once your API credentials are verified, focus on resolving any conflicts or misconfigurations that might be causing checkout disruptions.
Resolving Checkout Failures
Checkout failures often stem from plugin or theme conflicts. To troubleshoot, switch to a default WordPress theme and disable all plugins except WooCommerce and your payment gateway. If the checkout works after this, reactivate your plugins one at a time to identify the conflict. Caching and security plugins are frequent sources of trouble, as they can block API responses or prevent the "Thank You" page from loading.
Another common issue is improper webhook configuration. For gateways like PayPal or Authorize.Net, you need to manually set up notification URLs in their dashboards. Without this, your site might not receive confirmation of successful payments, leaving orders stuck in "Pending" status. Double-check that the callback URL in your gateway’s settings matches the one specified in WooCommerce.
Additionally, some gateways require specific server extensions like SOAP or cURL to function properly. Use the WooCommerce System Status Report to confirm that your server meets these requirements.
Solving Order Sync Problems
Even when transactions go through, order synchronization issues can arise. For instance, if payments are successful but orders remain in "Pending", it’s often due to IPN (Instant Payment Notification) or webhook delivery failures. Firewalls, Cloudflare protection, or CAPTCHA settings can block these automated notifications. Test this by entering your callback URL in a browser; if you see a CAPTCHA or "Access Denied" message, whitelist the payment processor’s IP addresses in your security settings.
Check the Order Notes section for individual WooCommerce orders. These notes log status changes and error messages from the gateway, offering clues about what went wrong.
Security tokens (nonces) can also expire due to aggressive caching, which can block status updates. Clear your site cache and temporarily disable caching plugins to fix this. Once the issue is resolved, remember to turn off transaction logging, as these files can grow quickly and slow down your site.
Conclusion
The payment gateway plugin you choose has a direct impact on your revenue. Even small hiccups in the checkout process can lead to abandonment rates as high as 70.19%. The right gateway ensures customers complete their purchases instead of abandoning their carts at the last moment.
To reduce abandonment, pick a gateway that aligns with your customers' payment habits and regional preferences. Global options like Stripe and PayPal are known for their reliability, while regional gateways such as Razorpay or Mollie may provide lower fees and better local support. Ignoring popular payment methods can significantly increase cart abandonment, so this decision plays a crucial role in creating a frictionless checkout experience.
Once you've selected a gateway, proper setup is critical to its success. Testing in sandbox mode, securing your site with an SSL certificate, and configuring webhooks accurately are just a few steps to ensure smooth functionality. Small changes, like showing shipping costs earlier in the process, can prevent 48% of abandonments caused by unexpected fees. On-site checkouts tend to convert better than redirects, and offering express options like Apple Pay can increase conversions by 21%. Additionally, limiting the number of payment options to two or three can help avoid overwhelming your customers.
Your payment gateway is more than just a tool - it’s a cornerstone of your e-commerce success. By choosing a gateway that fits your business needs, implementing strong security measures, and thoroughly testing your setup, you can create a seamless checkout experience that both builds trust and drives revenue.
FAQs
Do I need an on-site or redirect payment gateway?
When deciding between an on-site payment gateway and a redirect payment gateway, it's all about what works best for your business.
An on-site gateway keeps the entire payment process on your website. This creates a smoother checkout experience, which can help lower cart abandonment rates. It gives you more control over the user experience, making it feel seamless for your customers.
On the other hand, a redirect gateway takes customers to a third-party page to complete their payment. This option is often easier to set up and can provide an extra layer of security since the payment provider handles sensitive information.
If your priority is a polished, uninterrupted user experience, go with an on-site gateway. But if simplicity and security are more important, a redirect gateway might be the better choice.
What do I need to be PCI compliant with a gateway plugin?
To meet PCI compliance when using a gateway plugin, it's important to align your setup with PCI DSS standards. Opt for a gateway that limits your PCI scope - those with features like hosted fields or redirects are ideal since they prevent you from directly handling cardholder data. Also, make sure to activate an SSL certificate to encrypt transaction data, ensuring secure communication. Configuring your gateway correctly and staying compliant are key steps to safeguarding payment processing.
How do I fix orders stuck in “Pending” after payment?
When WooCommerce orders remain in the "Pending" status even after payment, the culprit is often tied to payment gateway notification issues or incorrect configurations. Here's what you need to check:
- Payment Gateway Setup: Double-check the configuration of your payment gateway. Ensure that features like Instant Payment Notification (IPN) or callback URLs are set up correctly. These notifications are crucial for updating order statuses automatically.
- Debug Logging: Turn on debug logging in WooCommerce. This can help you identify any errors or issues with the payment process.
- Plugin Updates and Credentials: Outdated plugins or incorrect credentials can interfere with how payments are processed. Make sure all plugins are up to date and that your payment gateway credentials are accurate.
- Merchant Account Status: Verify that your merchant account is active and functioning properly. If there’s an issue with your account, it could block order status updates.
Misconfigured or outdated settings are often the root cause of this issue, so a thorough review of your setup is essential to get things running smoothly.